
#
Terminal Server using IUCV
Congratulations you have unlocked an extra content! :)
On this chapter we will discuss the use of an IUCV Terminal Server to connect to Linux on z System guests. It will increase the availability by providing emergency access if the network for a system fails.
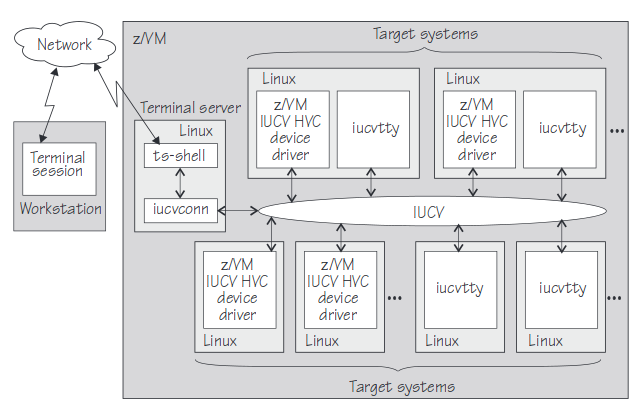
The terminal server and all target systems run as guests of the same z/VM instance. Terminal server and target systems are connected through the z/VM Inter-User Communication Vehicle (IUCV). From the terminal server, administrators can access terminal devices on target systems without requiring direct TCP/IP connections to the target systems.
You can use a terminal server to achieve these goals:
& Increase availability by providing emergency access to target systems if the primary network for these systems fails.
& Heighten security by separating user networks from administrator networks or by isolating sensitive Linux instances from IP networks.
& Simplify systems administration by providing a central access point to target systems.
#
Configuring the Server
The first step is to add two new statements to the server Directory. Our server is LINUX1, that way, we will execute the following DIRMAINT commands:
& To allow our Terminal Server to connect on any guest:
===> DIRM FOR LINUX1 IUCV ANY& We will limit the number of concurrent IUCV connections to 128. If omitted, the limit defaults to 64, the maximum value for MAXCONN is 65535
===> DIRM FOR LINUX1 SETOPTN ADD MAXCONN 128& The configuration for the server is complete. Logoff and restart LINUX1:
===> FORCE LINUX1& Wait for it LOGOFF and then:
===> XAUTOLOG LINUX1
#
Configuring The Client
& To configure the client we just need one statement:
===> DIRM FOR LINUX2 IUCV ALLOWTip If you want to set IUCV ALLOW to all your Linux guests set it in LINDFLT:
& The configuration for the client is complete. Logoff and restart LINUX2:
===> FORCE LINUX2& Wait for it LOGOFF and then:
===> XAUTOLOG LINUX2
#
Testing using iucvconn
& Login as root in LINUX1
& Execute:
linux1:~ # iucvconn LINUX2 lnxhvc0& Press ENTER twice and the login prompt will appear for LINUX2, logon as root and you will connect to LINUX2 via iucv.
#
Configuring ts-shell for an user
The ts-shell will lock an user to a limited shell that will only be able to connect or list the IUCV clients that it has access.
#
Creating an user that will be locked in ts-shell
& First lets create a group that will also be allowed to connect to some servers
groupadd testgrp& Create an user called "bob" that will be locked in ts-shell:
linux1:~ # useradd -m -s /usr/bin/ts-shell -g ts-shell -G testgrp bob& Change its password
linux1:~ # passwd bob& Authorize "bob" and its group to connect to LINUX2:
linux1:~ # vim /etc/iucvterm/ts-authorization.conf# Terminal server authorization configuration
#
# See ts-shell(1) manual page for file format syntax.
#
# See also authorization-sample.conf in the documentation directory.
#
@testgrp = list:linux2
bob = list:linux2& Enable audit on ts-shell
linux1:~ # /etc/iucvterm/ts-audit-systems.conf# List of z/VM guest virtual machines
# for which terminal session are logged
#
linux2
#
Testing ts-shell
& Login as "bob" in LINUX1, you will see a prompt like this:
Welcome to the Terminal Server shell.
Type 'help' to get a list of available commands.


bob@ts-shell>
& To connect to LINUX2 type:
bob@ts-shell> connect linux2& Press ENTER twice
#
Checking audit logs
& As root on LINUX1, go to /var/log/ts-shell/bob (There will be a folder for each user)
linux1:~ # cd /var/log/ts-shell/bob& List the files there
linux1:~ # ls /var/log/ts-shell/boblinux1:~ # ls /var/log/ts-shell/bob/
LINUX2_2016-07-21-211256 LINUX2_2016-07-21-211620.timing LINUX2_2016-07-21-211913.info LINUX2_2016-07-21-213401 LINUX2_2016-07-21-213510.timing
LINUX2_2016-07-21-211256.info LINUX2_2016-07-21-211652 LINUX2_2016-07-21-211913.timing LINUX2_2016-07-21-213401.info LINUX2_2016-07-21-213601
LINUX2_2016-07-21-211256.timing LINUX2_2016-07-21-211652.info LINUX2_2016-07-21-213354 LINUX2_2016-07-21-213401.timing LINUX2_2016-07-21-213601.info
LINUX2_2016-07-21-211620 LINUX2_2016-07-21-211652.timing LINUX2_2016-07-21-213354.info LINUX2_2016-07-21-213510 LINUX2_2016-07-21-213601.timing
LINUX2_2016-07-21-211620.info LINUX2_2016-07-21-211913 LINUX2_2016-07-21-213354.timing LINUX2_2016-07-21-213510.info& Choose one of these files and use "scriptreplay" to replay the session:
linux1:~ # scriptreplay LINUX2_2016-07-21-213354.timing LINUX2_2016-07-21-213354