
#
System z Device Drivers and Commands
Linux on z System has some special tools used to manage some devices and resources. This package is called s390x tools. You can get more info from http://www.ibm.com/developerworks/linux/linux390/s390-tools.html.
We are going to use some of s390x tools to increase/decrease resources dynamically.
#
z/VM CP interface device driver (vmcp)
Using the z/VM CP interface device driver (vmcp), you can send control
program (CP) commands to the VM hypervisor and display VM's response.
The vmcp module is loaded during the initialization because we have
setup it on boot.local (Section
Display its status to make sure that the module is loaded correctly.
# lsmod | grep vmcpThe vmcp module is now loaded. Test it by using some z/VM CP commands:
# vmcp query dasd
# vmcp indicate user
# vmcp q dasd
# vmcp q stor
#
Managing Virtual CPU
In our LINDFLT PROFILE we specified the maximum number of processors allowed for the guest when we applied the following line:
PROFILE LINDFLT
COMMAND CP SET PF12 RETRIEVE
COMMAND SET VSWITCH VSW1 GRANT &USERID
COMMAND DEFINE NIC 600 TYPE QDIO
COMMAND COUPLE 600 TO SYSTEM VSW1
IPL CMS
(*|\textcolor{red}{MACH ESA 2 }|*)
CPU 00 BASE
OPTION APPLMON
& Check how many CPUs you have for your guest using the command lscpu:
# lscpu
Architecture:          s390x
CPU op-mode(s):        32-bit, 64-bit
Byte Order:            Big Endian
CPU(s):                1                   <=====
On-line CPU(s) list:   0
Thread(s) per core:    1
Core(s) per socket:    1
Socket(s) per book:    1
Book(s):               1
Vendor ID:             IBM/S390
BogoMIPS:              226.00
Hypervisor:            z/VM 6.3.0
Hypervisor vendor:     IBM
Virtualization type:   full
Dispatching mode:      horizontal
& To change the number of CPUs dinamically you can use the command vmcp def cpu <n> and chcpu:
                  .---------.
                  V         |
>>-DEFine--CPU--+---cpuaddr-+---------------------+------------->
                +-cpuaddr1-cpuaddr2---------------+
                '-cpuaddr1--+----+--CPU--cpuaddr2-'
                            '-AS-'

>--+----------------+------------------------------------------><
   '-TYPE--+-CP---+-'
           +-IFL--+
           +-ZAAP-+
           +-ZIIP-+
           '-ICF--'
Usage:
chcpu [options]
Options:
-h, --help print this help
-e, --enable <cpu-list> enable cpus
-d, --disable <cpu-list> disable cpus
-c, --configure <cpu-list> configure cpus
-g, --deconfigure <cpu-list> deconfigure cpus
-p, --dispatch <mode> set dispatching mode
-r, --rescan trigger rescan of cpus
-V, --version output version information and exit& The first step is to define you CPU via vmcp:
# vmcp def cpu 1
CPU 01 defined
& The "cpu 0" is the base and it is already defined by LINDFLT. Use chcpu -r to rescan your CPUs:
# chcpu -r
Triggered rescan of CPUs
& lscpu should show you 2 CPUs now
# lscpu
Architecture:          s390x
CPU op-mode(s):        32-bit, 64-bit
Byte Order:            Big Endian
CPU(s):                2
On-line CPU(s) list:   0,1
Thread(s) per core:    1
Core(s) per socket:    1
Socket(s) per book:    1
Book(s):               2
Vendor ID:             IBM/S390
BogoMIPS:              226.00
Hypervisor:            z/VM 6.3.0
Hypervisor vendor:     IBM
Virtualization type:   full
Dispatching mode:      horizontal
& To make your changes permanent you need to add it to LINUX2 directory using DIRM CPU:
dirm for LINUX2 cpu 01
DVHXMT1191I Your CPU request has been sent for processing to DIRMAINT at
DVHXMT1191I SSI1.
Ready; T=0.13/0.15 14:43:40
 DVHREQ2288I Your CPU request for LINUX2 at * has been accepted.
 DVHBIU3450I The source for directory entry LINUX2 has been updated.
 DVHBIU3423I The next ONLINE will take place via Diagnose 84.
 DVHBIU3428I Changes made to directory entry LINUX2 have been placed
 DVHBIU3428I online.
 DVHREQ2289I Your CPU request for LINUX2 at * has completed; with RC = 0.
& If you want to delete a CPU you can use the DELETE suffix:
dirm for LINUX2 cpu 01 delete
DVHXMT1191I Your CPU request has been sent for processing to DIRMAINT at
DVHXMT1191I SSI1.
Ready; T=0.18/0.20 14:44:40
 DVHREQ2288I Your CPU request for LINUX2 at * has been accepted.
 DVHBIU3450I The source for directory entry LINUX2 has been updated.
 DVHBIU3424I The next ONLINE will take place immediately.
 DVHDRC3451I The next ONLINE will take place via delta object directory.
 DVHBIU3428I Changes made to directory entry LINUX2 have been placed
 DVHBIU3428I online.
 DVHREQ2289I Your CPU request for LINUX2 at * has completed; with RC = 0.
& To remove from Linux execute
]# chcpu -d 1
CPU 1 disabled
#
Virtual Memory
The amount of memory that z/VM allocates to a VM is defined in the directory statement.
Our LINUX PROTODIR defines our Linux with 1GB of memory
USER LINUX NOLOG 1G 1G G
...
Anyway you are able to query it using the following DIRMAINT command:
===> dirm for LINUX2 storage ?dirm for LINUX2 storage ?
DVHXMT1191I Your STORAGE request has been sent for processing to
DVHXMT1191I DIRMAINT at SSI1.
Ready; T=0.17/0.20 15:07:21
DVHREQ2288I Your STORAGE request for LINUX2 at * has been accepted.
DVHSTO3207I LINUX2 currently has a maxstorage value of 1G and a
DVHSTO3207I default storage value of 1G.
DVHREQ2289I Your STORAGE request for LINUX2 at * has completed; with
DVHREQ2289I RC = 0.To change it to a new value you can use the same command changing the suffix to a new value:
===> dirm for LINUX2 storage 512Mdirm for LINUX2 storage 512M
DVHXMT1191I Your STORAGE request has been sent for processing to
DVHXMT1191I DIRMAINT at SSI1.
Ready; T=0.19/0.21 15:08:38
DVHREQ2288I Your STORAGE request for LINUX2 at * has been accepted.
DVHBIU3450I The source for directory entry LINUX2 has been updated.
DVHBIU3423I The next ONLINE will take place via Diagnose 84.
DVHBIU3428I Changes made to directory entry LINUX2 have been placed
DVHBIU3428I online.
DVHREQ2289I Your STORAGE request for LINUX2 at * has completed; with
DVHREQ2289I RC = 0.
dirm for LINUX2 storage ?
DVHXMT1191I Your STORAGE request has been sent for processing to
DVHXMT1191I DIRMAINT at SSI1.
Ready; T=0.12/0.14 15:08:50
DVHREQ2288I Your STORAGE request for LINUX2 at * has been accepted.
DVHSTO3207I LINUX2 currently has a maxstorage value of 1G and a
DVHSTO3207I default storage value of 512M.
DVHREQ2289I Your STORAGE request for LINUX2 at * has completed; with
DVHREQ2289I RC = 0.To apply the new changes you need to shutdown your VM guest and reIPL it again using XAUTOLOG:
force linux2
HCPSIG2114I User LINUX2 termination may be delayed for up to 600 seconds
Ready; T=0.01/0.01 15:09:40
USER DSC   LOGOFF AS  LINUX2   USERS = 31    FORCED BY MAINT
xautolog linux2
Command accepted
Ready; T=0.01/0.01 15:10:29
AUTO LOGON *** LINUX2 USERS = 32
HCPCLS6056I XAUTOLOG information for LINUX2: The IPL command is verified by the
IPL command processor.After the reipl, you can check the new memory amount:
# free -m
             total       used       free     shared    buffers     cached
Mem:           494         70        423          0          5         35
-/+ buffers/cache:         29        464
Swap:          561          0        561
#
Defining standby memory
If you want to configure an amount of standby memory for dynamically increase you can add a "COMMAND" statement to the directory:
DIRM FOR LINUX2 COMMANDFill the panel like this:
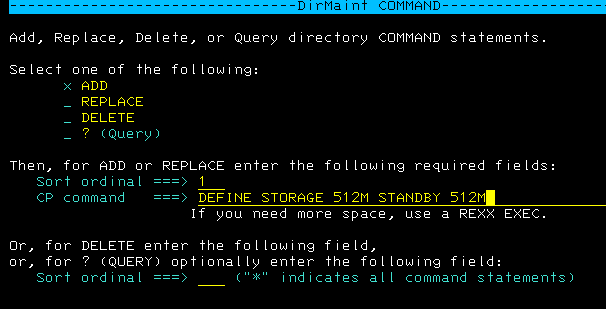
The panel above sets 512 MB as default memory value and 512 MB set as a standby.
linux2:~ # lsmem
Address Range                          Size (MB)  State    Removable  Device
===============================================================================
0x0000000000000000-0x000000001fffffff        512  online   no         0-511
0x0000000020000000-0x000000003fffffff        512  offline  -          512-1023

Memory device size  : 1 MB
Memory block size   : 256 MB
Total online memory : 512 MB
Total offline memory: 512 MB
As you can see there is one memory block that is "offline", to enable it use chmem command:
linux2:~ # chmem -e 256
linux2:m~ # lsmem
Address Range                          Size (MB)  State    Removable  Device
===============================================================================
0x0000000000000000-0x000000001fffffff        512  online   no         0-511
0x0000000020000000-0x000000002fffffff        256  online   yes        512-767
0x0000000030000000-0x000000003fffffff        256  offline  -          768-1023

Memory device size  : 1 MB
Memory block size   : 256 MB
Total online memory : 768 MB
Total offline memory: 256 MB
You can disable an amount of memory using "-d" option:
linux1-titog:~ # chmem -d 256
linux1-titog:~ # lsmem
Address Range                          Size (MB)  State    Removable  Device
===============================================================================
0x0000000000000000-0x000000001fffffff        512  online   no         0-511
0x0000000020000000-0x000000003fffffff        512  offline  -          512-1023

Memory device size  : 1 MB
Memory block size   : 256 MB
Total online memory : 512 MB
Total offline memory: 512 MB
#
Working with Disks
Another useful command is lsdasd:
# lsdasd
Bus-ID     Status      Name      Device  Type  BlkSz  Size      Blocks
==============================================================================
0.0.0100   active      dasda     94:0    ECKD  4096   1125MB    288000
0.0.0101   active      dasdb     94:4    ECKD  4096   457MB     117000
0.0.0102   active      dasdc     94:8    ECKD  4096   4230MB    1082880
0.0.0103   active      dasdd     94:12   ECKD  4096   457MB     117000
0.0.0104   active      dasde     94:16   ECKD  4096   562MB     144000
It shows you the VDEV number and how Linux named it, example, minidisk 100 (this is how z/VM sees it) is /dev/dasda for Linux.
This is useful for disk maintenance and LVM.
& Lets add a new disk to Linux
DIRM FOR LINUX2 AMD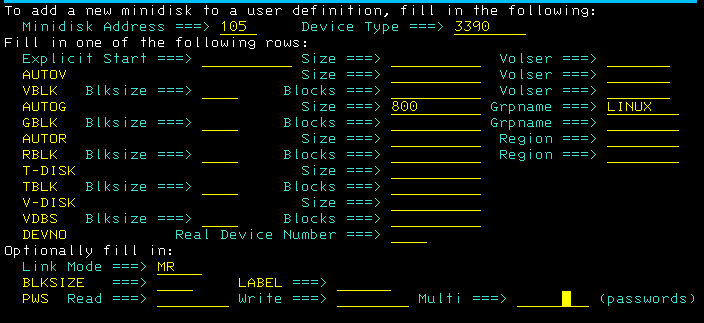
& lsdasd command still does not show you the new device
& To update our lsdasd view we will use vmcp command:
linux2:~ # vmcp link '* 105 105 mr'& Enable the new device:
linux2:~ # chccwdev -e 105
Setting device 0.0.0105 online
Done
& lsdasd will now show the new device unformatted:
linux2:~ # lsdasd
Bus-ID     Status      Name      Device  Type  BlkSz  Size      Blocks
==============================================================================
0.0.0100   active      dasda     94:0    ECKD  4096   1125MB    288000
0.0.0101   active      dasdb     94:4    ECKD  4096   457MB     117000
0.0.0102   active      dasdc     94:8    ECKD  4096   4230MB    1082880
0.0.0103   active      dasdd     94:12   ECKD  4096   457MB     117000
0.0.0104   active      dasde     94:16   ECKD  4096   562MB     144000
0.0.0105   n/f         dasdf     94:20   ECKD
& From the output above we can see that the new device is dasdf. To format new device use the following commands:
linux2:~ # dasdfmt -p -b 4096 -y -f /dev/dasdf

cyl   800 of   800 |##################################################| 100%

Finished formatting the device.
Rereading the partition table... ok
& Create a partition using fdasd:
linux2:~ # fdasd -a /dev/dasdf
reading volume label ..: VOL1
reading vtoc ..........: ok

auto-creating one partition for the whole disk...
writing volume label...
writing VTOC...
rereading partition table...
& To activate this new disk at boot time use dasd_configure:
linux2:~ # dasd_configure 0.0.0105 1 & The new dasd is now available for LVM. Lets assume that we want to create a new VG called appvg with one logical volume called myapp.
& The first step is to create a PV using our new device:
linux2:~ # pvcreate /dev/dasdf1
  Physical volume "/dev/dasdf1" successfully created
& Create a new VG:
linux2:~ # vgcreate appvg /dev/dasdf1
  Volume group "appvg" successfully created
& Check the size of your new vg:
linux1-titog:~ # vgs
  VG     #PV #LV #SN Attr   VSize   VFree
  appvg    1   1   0 wz--n- 560,00m 560,00m
  home     1   1   0 wz--n- 456,00m  4,00m
  optvg    1   1   0 wz--n- 456,00m  4,00m
  system   1   3   0 wz--n-   4,13g     0
& Create the new LV:
linux2:~ # lvcreate -L 500M -n myapp appvg
  Logical volume "myapp" created
& Format it using ext3:
linux2:~ # mkfs.ext3 /dev/appvg/myapp
mke2fs 1.41.9 (22-Aug-2009)
Filesystem label=
OS type: Linux
Block size=4096 (log=2)
Fragment size=4096 (log=2)
128000 inodes, 128000 blocks
6400 blocks (5.00%) reserved for the super user
First data block=0
Maximum filesystem blocks=134217728
4 block groups
32768 blocks per group, 32768 fragments per group
32000 inodes per group
Superblock backups stored on blocks:
    32768, 98304

Writing inode tables: done
Creating journal (4096 blocks): done
Writing superblocks and filesystem accounting information: done

This filesystem will be automatically checked every 27 mounts or
180 days, whichever comes first.  Use tune2fs -c or -i to override.
& Create the new directory and mount the new LV:
linux2:~ # mkdir /myapp

linux2:~ # mount /dev/appvg/myapp  /myapp
linux2:~ # df -h
Filesystem               Size  Used Avail Use% Mounted on
/dev/dasda1              1,1G  193M  858M  19% /
udev                     246M  152K  246M   1% /dev
tmpfs                    246M     0  246M   0% /dev/shm
/dev/mapper/home-home    438M   17M  399M   4% /home
/dev/mapper/optvg-opt    438M   17M  399M   4% /opt
/dev/mapper/system-tmp   485M   17M  443M   4% /tmp
/dev/mapper/system-usr   2,0G  1,3G  635M  67% /usr
/dev/mapper/system-var   1,7G  102M  1,5G   7% /var
/dev/mapper/appvg-myapp  485M   17M  443M   4% /myapp
& To make it active during the boot add this line at the end of /etc/fstab
/dev/appvg/myapp /myapp ext3 defaults 1 2
#
Exercise
Try to add a new DASD to your Linux and extend /usr to 2.5G.
Tip: 800 cyl is about 500 MB
Steps:
On z/VM as MAINT: & DIRM FOR LINUX2 AMD
On Linux as root: & vmcp link '* 106 106 mr'
& chccwdev -e 106
& dasdfmt -p -b 4096 -y -f /dev/dasdg
& fdasd -a /dev/dasdg
& dasd_configure 0.0.0106 1
& pvcreate /dev/dasdg1
& vgextend system /dev/dasdg1
& lvextend -L+500M /dev/system/usr
& resize2fs /dev/system/usr
& df -h