
#
Installing Linux
#
Linux PROFILE EXEC
& Logon on VMTOOLS
& Inside VMTOOLS 192 disk make sure that there is a file called PROFILE EXEC.
X PROFILE EXEC D& If it is empty, use input mode and paste the following content:
/* PROFILE EXEC for Linux virtual servers */
'CP SET RUN ON'
'CP SET PF11 RETRIEVE FORWARD'
'CP SET PF12 RETRIEVE'
'ACC 592 C'
'PIPE CP QUERY' userid() '| var user'
parse value user with id . dsc .
if (dsc = 'DSC') then /* user is disconnected */
'CP IPL 100'
else /* user is interactive -> prompt */
do
say 'Do you want to IPL Linux from minidisk 100? y/n'
parse upper pull answer .
if (answer = 'Y') then 'CP IPL 100'
end
The PROFILE EXEC that you just copied is a REXX EXEC that is analogous to a .bash_profile startup script. If the user ID is logged on in a disconnected mode (usually via XAUTOLOG), Linux will be IPLed from minidisk 100. Otherwise, the user is prompted.
#
Running The Installation
& Logon on LINUX1, answer "no" when asked to IPL 100.
& Run the setup REXX (The name of the file may differ depending on the distruibution, ask your instructor).
LINUX& The Linux boot output will show up and at the end you may see:
...
Linux version 3.0.76-0.9-default (geeko@buildhost) (gcc version 4.3.4 [gcc-4_3-b
ranch revision 152973] (SUSE Linux) ) #1 SMP Fri May 31 09:17:47 UTC 2013 (82ad5
ef)
setup.1a06a7: Linux is running as a z/VM guest operating system in 64-bit mode
Zone PFN ranges:
  DMA 0x00000000 -> 0x00080000
  Normal empty
Movable zone start PFN for each node
early_node_map[1] active PFN ranges
   0: 0x00000000 -> 0x00040000
PERCPU: Embedded 10 pages/cpu @0000000002a4d000 s11776 r8192 d20992 u40960
Built 1 zonelists in Zone order, mobility grouping on. Total pages: 258560
Kernel command line: ramdisk_size=65536 root=/dev/ram1 ro init=/linuxrc TERM=dum
b        HostIP=9.12.7.8
         Hostname=virtcook8.itso.ibm.com
         Gateway=9.12.4.1
         Netmask=255.255.240.0 Layer2=1
         ReadChannel=0.0.0600 WriteChannel=0.0.0601 DataChannel=0.
0.0602   Nameserver=9.12.6.7
         portname=whatever portno=0
         Install=nfs://9.12.5.251/srv/nfs/s11s3
         UseSSH=1 SSHPassword=12345678
         UseVNC=1 VNCPassword=12345678
         InstNetDev=osa OsaInterface=qdio OsaMedium=eth Manual=0
...
& You should be prompted for Installation Instructions, these steps are covered in class with your instructor.
& After all steps, you should see messages showing the installation system being loaded. For example:
...
Loading Installation System (1/6) (24640 kB) - 3%  4%  5%  6%  7%  8%
...
& A VNC server process will be started. You should see the following messages:
starting VNC server...
A log file will be written to: /var/log/YaST2/vncserver.log ...
***
***
You can connect to <host>, display :1 now with vncviewer
***
Or use a Java capable browser on http://<host>:5801/
***
*** Starting YaST2 ***
& Start a VNC viewer session to the installation process.
& You should see a window entitled Welcome. Select your Language and Keyboard. After reading the License Agreement, click the check-box I Agree to the License Terms, then click Next.
& At the Disk Activation window, click Configure DASD Disks.
& At the DASD Disk Management window:
&& Click Select or Deselect for the two read/write disks (100, 101, 102, 103 and 104).
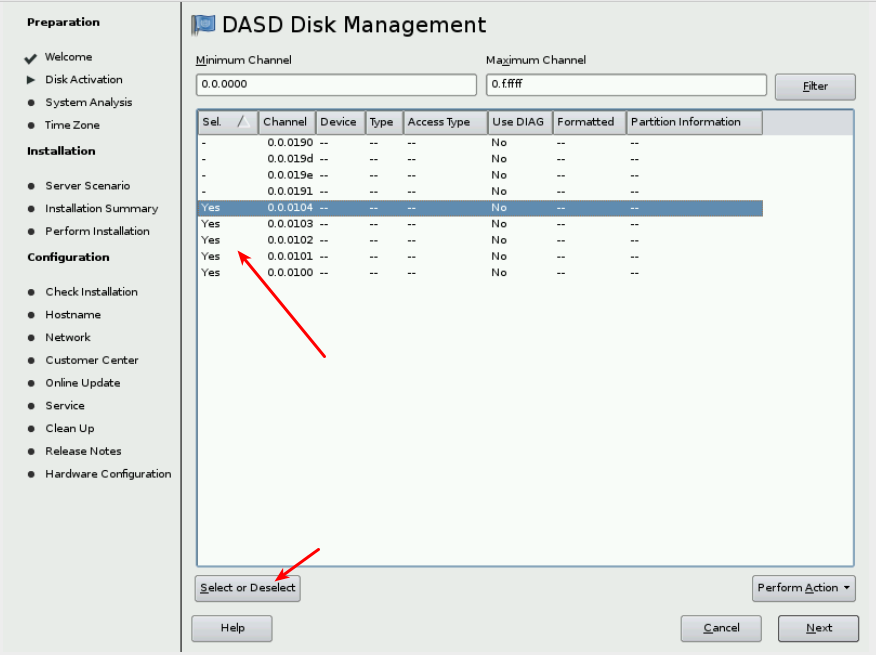
&& Click Activate on the Perform Action pop-up menu. If the DASDs have not been formatted previously, you will be asked if you want to format them now. Format the DASDs now. This will take a few minutes.
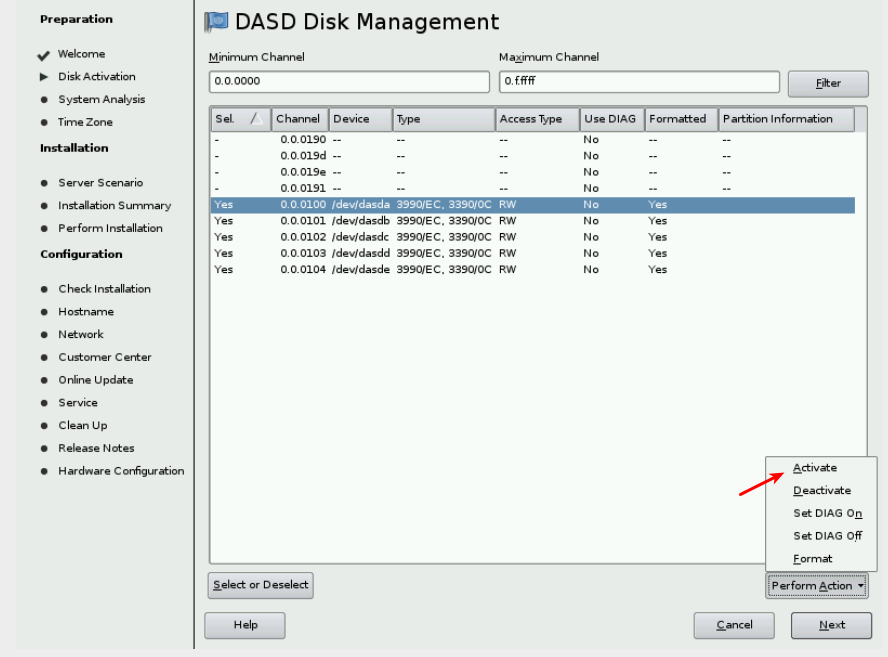
&& If you want to make sure to get the disks in a certain device order, activate them one by one. The first disk will be /dev/dasda, the second disk will be /dev/dasdb, and so on.
&& The DASDs will be activated quickly.
&& Click Next when the formatting is complete.
&& In the Disk Activation window, click Next.
& If you see a pop-up window stating "The partitioning on disk X is not readable by the partitioning tool parted...", click OK
& From this point, the installation process behaves identically to any other architecture.
& In the Installation Mode window, accept the default of New
installation and click Next. & In the Clock and Time Zone window,
select your time settings and click Next. & In the Installation Settings
window, click the tab Expert. & In the Installation Settings window,
click Partitioning. & In the Preparing Hard Disk window, accept the
default of Customer Partitioning (for experts) and click Next. & In
the Expert Partitioner window and the System View column on the
left, click a plus sign next to Hard Disks to expand a list of all
available disks, check figure

& Double-click the IBM-DASD that corresponds to the 100 minidisk in the
Available Storage section. In this example, it is /dev/dasda (about 1GB)
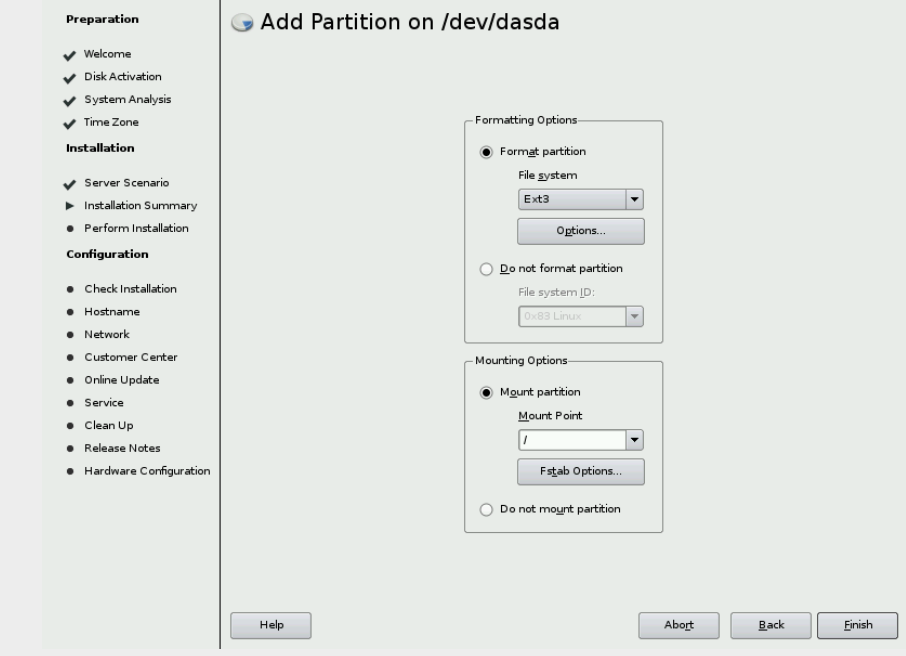
& In the Hard Disk: /dev/dasda section, click the Add button to add a
partition. & In the Add Partition window on /dev/dasda, set partition
size to Maximum Size (1.10GB) and click Next. & On the next screen,
accept the defaults (Format partition, Ext3 file system, Mount
partition, and a Mount Point of /), as shown in Figure
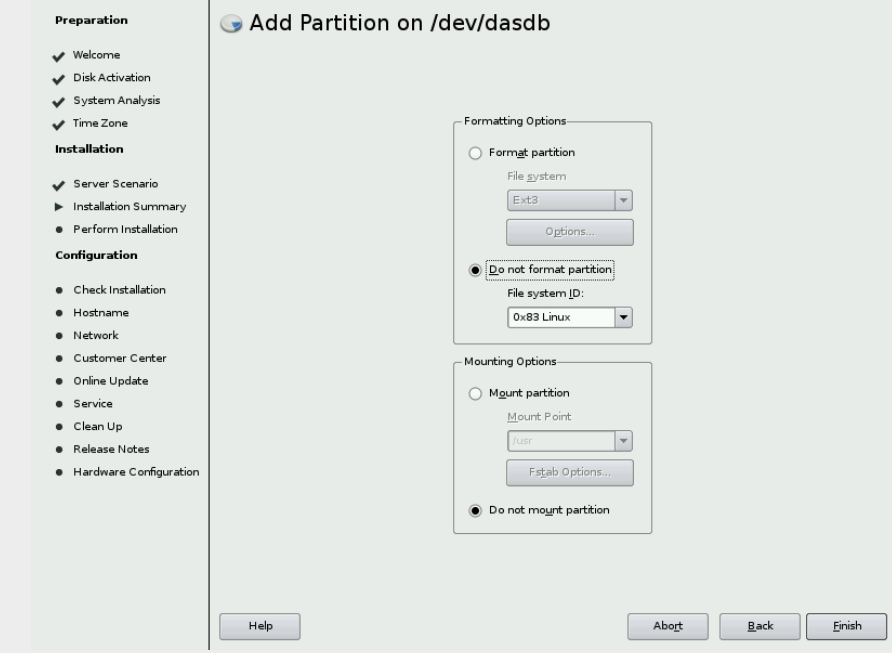
& Create an empty partition /dev/dasdb, /dev/dasdc, /dev/dasdd in the
same fashion as you did to create /dev/dasda but (Select /dev/dasdb
=> Add => Maximum Size => Do not format/Do not mount partition).
Accept the default size of all the space. Check figure
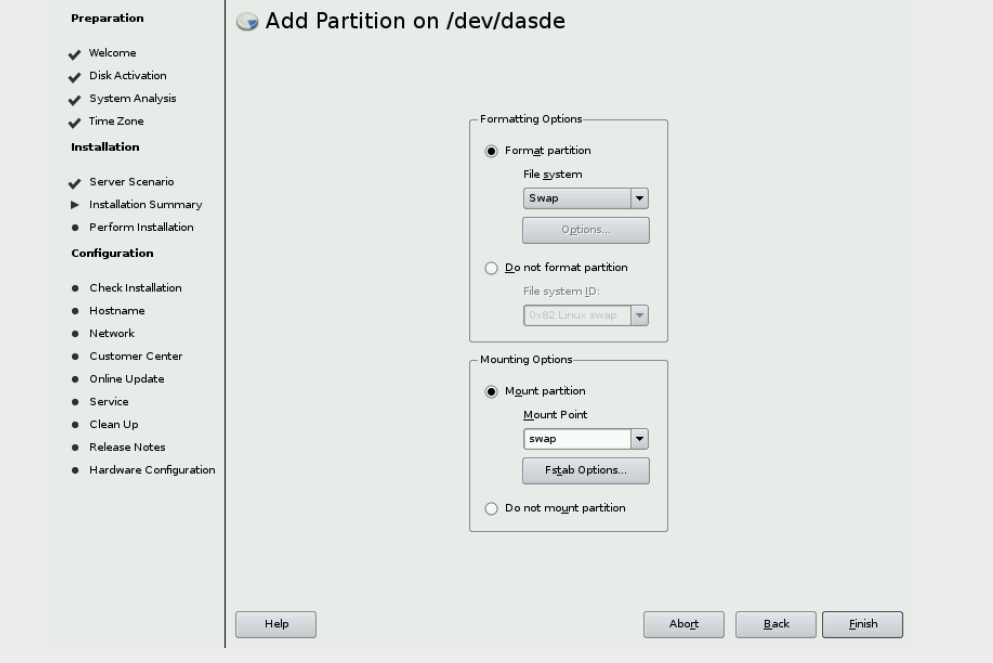
& For /dev/dasde format the partition as Swap. Check figure
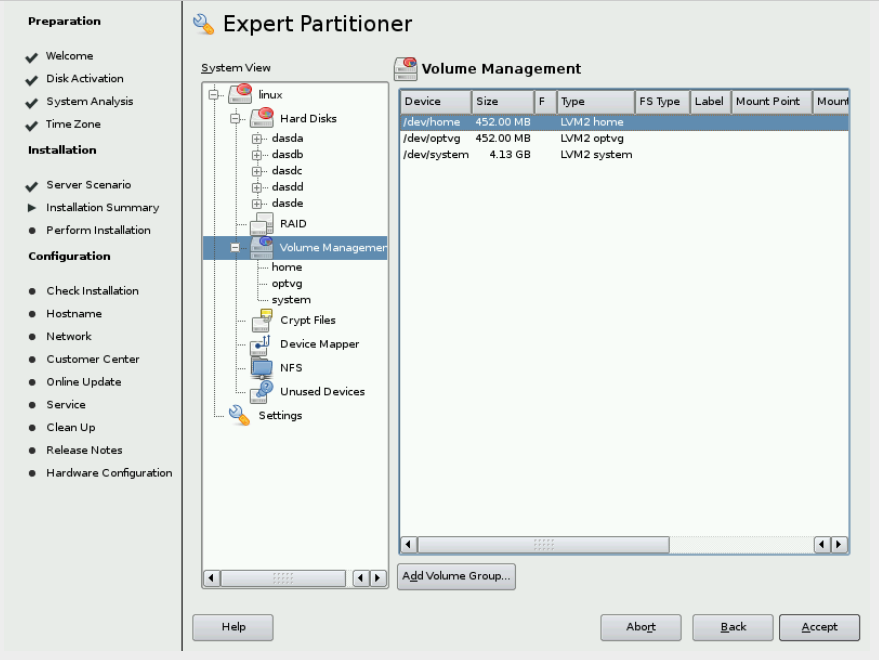
& Now /dev/dasdb,c,d can be used to create a volume group. Click Volume
Management as shown on Figure

& Click Add => Volume Group. & At the Add Volume Group window, set the volume group name to optvg. & Click Add after selecting /dev/dasdb1 to the Selected Physical Volumes. Click Finish.
& Click Add => Volume Group again. & At the Add Volume Group window, set the volume group name to system. & Click Add after selecting /dev/dasdc1 to the Selected Physical Volumes. Click Finish.
& Click Add => Volume Group again. & At the Add Volume Group window, set the volume group name to home. & Click Add after selecting /dev/dasdd1 to the Selected Physical Volumes. Click Finish.
& Your Volume Management screen should be like this:
& Back in Expert Partitioner, click the plus sign to the left of
Volume Management. You should see the new home, system and optvg
volume group. & Click on each and the Volume Group window will be
displayed, as shown on Figure
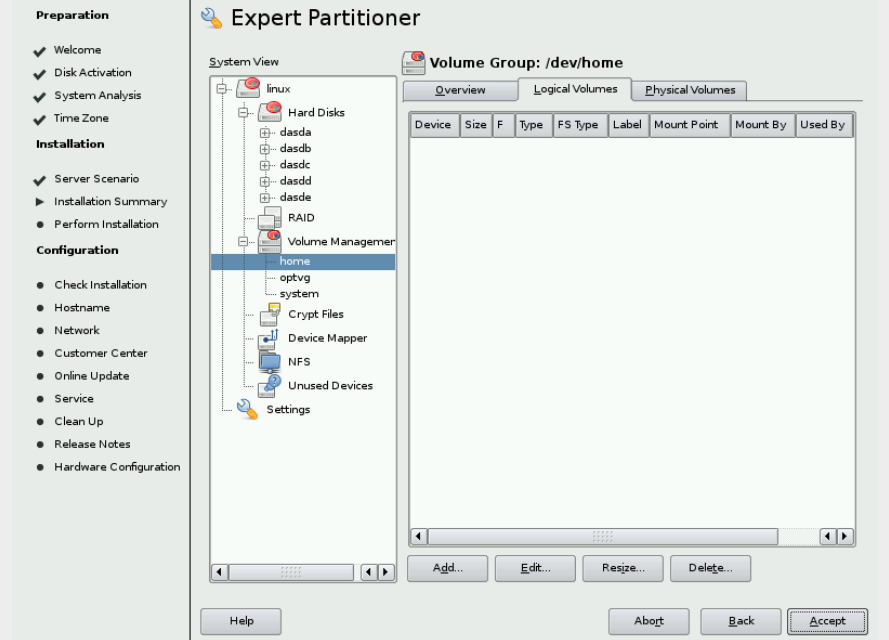
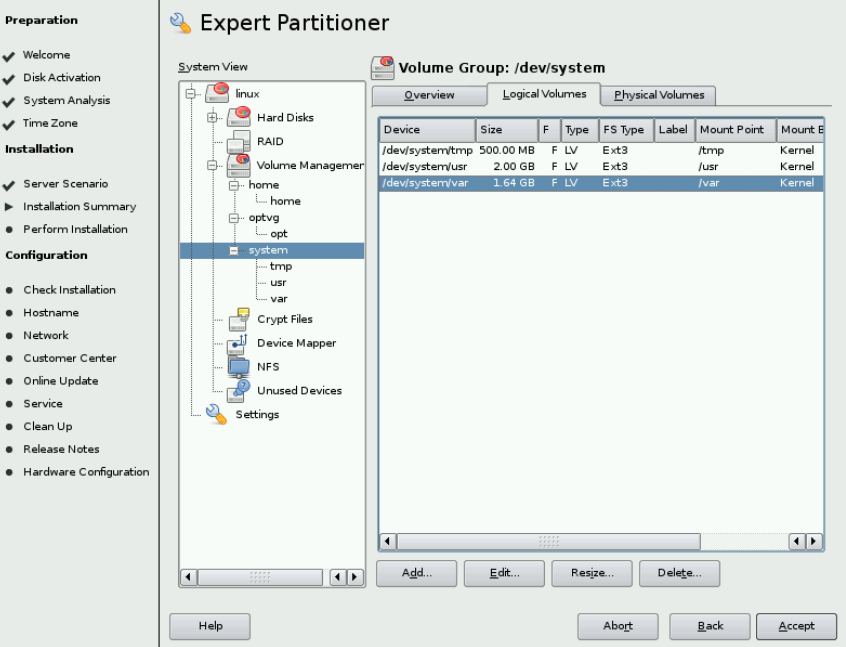
& Enter home as the name for new logical volume and click Next. & On the Add Logical Volume window, click the Maximum Size radio button (452Mb) Click Next. & Accept ext3 as the File System type and the Mount point of /home. Click Finish. & Now click on optvg mount point and create a opt using the Maximum Size of optvg, File System type ext3 and Mount point of /opt. & For system vg you will create 3 Logical Volumes: && tmp - /tmp - 500MB ext3 && usr - /usr - 2GB ext3 && var - /var - the rest (about 1.64GB) ext3
Check figure
& Click Accept.
& The Figure

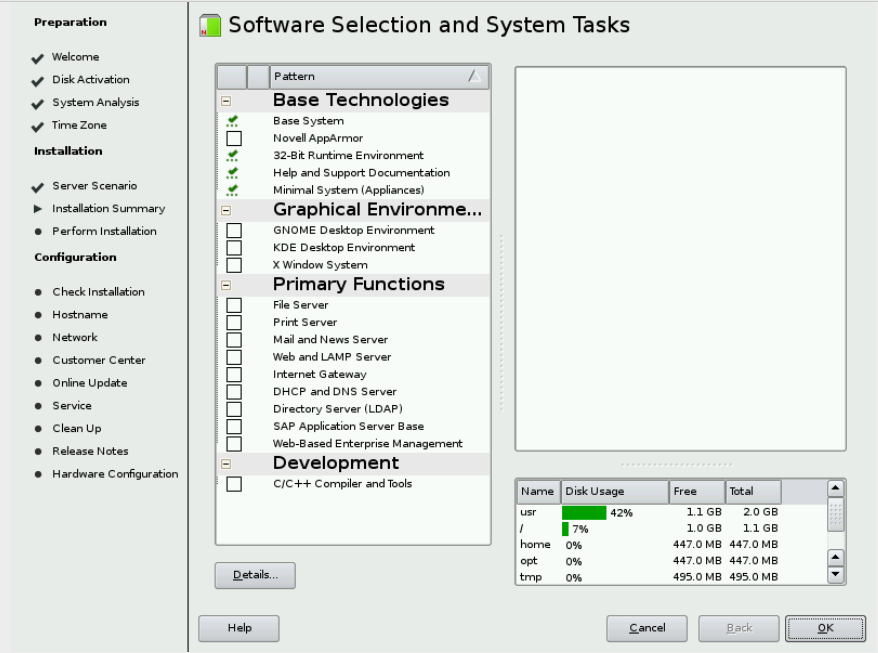
& In the Installation Settings window, select Software. You might see a
Disk Space Warning window. If so, click OK. & The Software Selection
window opens. Leave Base System, 32-Bit Runtime Environment, Help and
Support Documentation, and Minimal System selected. Clear all other
setting as shown in Figure
& In the Expert tab, move down to Default Runlevel and choose 3: Full multiuser with network. Click OK. You will receive a VNC warning. Click Yes.
& You are ready to begin the installation. Click Install.
& The window Finishing Basic Installation will appear, then the VNC client will end and the system will reboot. Go back to the 3270 console and clear the screen a number of times. & Restart or go back to the same VNC client used for the first part of installation. From a browser either click Login Again or click the browser's refresh button until another VNC login window appears. If you are using a VNC client, open that application again. & Log in using the same VNC password (12345678 in this example). & In the Password for root user window, type the root password twice and click Next. Do not forget this password. & In the Hostname and Domain Name window, both Hostname and Domain Name are entered by the installer as they are specified in LINUX PARM file. In this example, linux1-titog is the host name and workshop.ibm.com is the domain name. Clear the Change Hostname via DHCP check-box. Click Next. & In the Network Configuration window you will see Firewall is enabled, click the word disable to disable it. All other values should be correct; therefore, just click Next. & In the Test Internet Connection window, if you do not have Internet access, select No, skip this test, and click Next. & In the Network Services Configuration window, accept the default and click Next. A certificate will be created. & In the User Authentication Method window, select Local (/etc/passwd) and click Next. & In the New Local User window, add at least one user to have a non-root ID on all cloned systems. When you are done, click Next. & In the Writing the system configuration window the SuSEconfig tool writes all your settings to disk. & The next window will be Release Notes. After reviewing the release notes, click Next. & In the Hardware Configuration window, choose the Skip Configuration radio button and click Next. & The last installation window is Installation Completed. Clear the box Clone This System for AutoYaST2 check box and click Finish.
The VNC session should end. Return to the 3270 session and you may have to clear the screen a few times. Then, you should see a login prompt. You are done installing Linux! You can disconnect from the 3270 session using the DISCONNECT command:
==> #cp discYou can now access this Linux system using SSH.
#
Initial configuration
#
Disable Unneeded Services
In order to keep the golden image as lean as possible in terms of CPU usage, some of these services can be turned off. Turn off the following services by using the following chkconfig commands:
chkconfig auditd off
chkconfig fbset off
chkconfig network-remotefs off
chkconfig postfix off
chkconfig splash off
chkconfig splash_early off
chkconfig smartd off
#
Install CMSfs
To read CMS files from Linux, the cmsfs RPM is used. The clone script requires it to read parameter files. To add this package to the golden image, use:
(*|\textbf{linux1-titog:~ \# zypper in cmsfs}|*)
Loading repository data...
Reading installed packages...
Resolving package dependencies...

The following NEW package is going to be installed:
  cmsfs


Overall download size: 33,0 K. After the operation, additional 148,0 K will be used.
Continue? [YES/no]: YES
Retrieving package cmsfs-1.1.8-6.2.s390x (1/1), 33,0 K (148,0 K unpacked)
Retrieving: cmsfs-1.1.8-6.2.s390x.rpm [done]
Installing: cmsfs-1.1.8-6.2 [done]
#
Configure /etc/inittab
Linux reboots when a Ctrl-Alt-Del key sequence is trapped. This key sequence is simulated by z/VM when it issues a SIGNAL SHUTDOWN command. Rather than rebooting, it might be better that your system halts (shuts down).
Change shutdown -r to shutdown -h:
(*|\textbf{\# cd /etc}|*)
(*|\textbf{\# cp inittab inittab.orig}|*)
(*|\textbf{\# vi inittab}|*)
...
# The default runlevel is defined here
(*|\textbf{id:3:initdefault:}|*)
...
# what to do when CTRL-ALT-DEL is pressed
ca::ctrlaltdel:/sbin/(*|\textbf{shutdown -h}|*) -t 4 now
...
This change will be picked up when the system is rebooted.
#
Configure boot.local
The chshut command is added twice so that the virtual machine is logged off after it is halted or powered off. This will allow for an orderly shutdown of z/VM. To do so, add the following four lines to boot.local:
(*|\textbf{\# vi /etc/init.d/boot.local}|*)
...
# Here you should add things, that should happen directly after booting
# before we're going to the first run level.
#
(*|\textbf{modprobe vmcp}|*)
(*|\textbf{chshut halt vmcmd logoff}|*)
(*|\textbf{chshut poff vmcmd logoff}|*)
You can execute /etc/init.d/boot.local to test the new settings:
(*|\textbf{linux1-titog:~ \# bash /etc/init.d/boot.local}|*)
(*|\textbf{linux1-titog:~ \# lsshut }|*)
Trigger          Action
========================
Halt             vmcmd ("logoff")
Panic            stop
Power off        vmcmd ("logoff")
Reboot           reipl
Your Linux first image is now ready!