
#
Creating a Virtual Machine
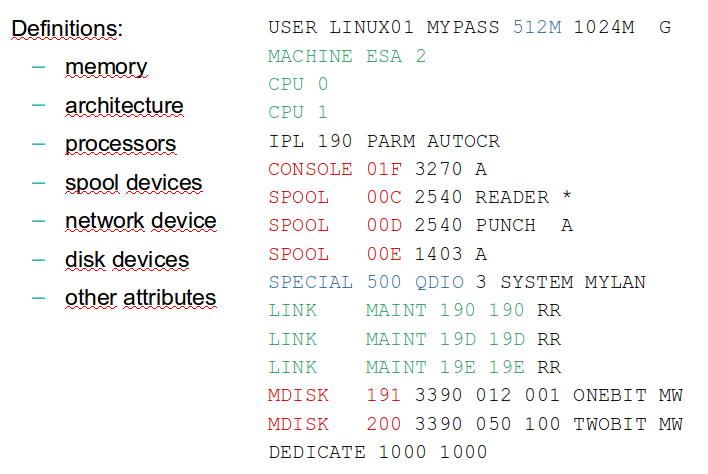
The z/VM user directory specifies the configuration and operating characteristics of virtual machines. A z/VM user directory exists in two forms: a source form that consists of one or more CMS files, and an object form, created from the source, on a CP-formatted disk. Each virtual machine has a directory entry. Here is a sample directory entry:
The sample on figure
An entry begins with one of the following statements: GLOBALDEFS (global definitions entry), PROFILE (profile entry), USER (user entry), IDENTITY (identity entry), or SUBCONFIG (subconfiguration entry). For our workshop the most important entries are PROFILE and USER, anyway the others entries are also explained.
#
DIRECTORY definition
The DIRECTORY Definition consists of one or more DIRECTORY control statements that define the output of object directories. The DIRECTORY statement defines to CP the device on which you have allocated space for the directory. (These devices must also be a CP_owned volume). The user directory itself is managed by DIRMAINT.
The following DIRECTORY definition simply says DASD volume M01RES has directory space allocated on it for the object directory. It is a 3390 device type, and 123 is the virtual device number which contains the directory.
DIRECTORY 123 3390 M01RESYou can query DIRECTORY definitions info executing:
DIRM DIRECTORY ?
#
GLOBAL definition
The Global Definition section begins with the GLOBALDEFS directory control statement. It also includes directory control statements that define global settings to be used across all user definitions. This is an optional statement. If specified it must directly precede all PROFILE and USER definitions. There can be only one GLOBALDEFS directory control statement specified. The user directory that came with the installed system contains the following Globaldefs:
00026 *
00027 GLOBALDEFS
00028       POSIXGROUP system 0
00029       POSIXGROUP staff  1
00030       POSIXGROUP bin    2
00031       POSIXGROUP sys    3
00032       POSIXGROUP adm    4
00033       POSIXGROUP mail   6
00034       POSIXGROUP security 7
00035       POSIXGROUP nobody 4294967294
00036 *
00037 ***************************************************************
#
PROFILE definitions
Each PROFILE definition begins with a PROFILE directory control statement and consolidates other directory control statements that are commonly used across multiple users. When PROFILE is specified it must follow the last DIRECTORY statement, the global definition section (if any), and precede the USER statements.
This is an example of profile:
PROFILE IBMDFLT
  SPOOL 000C 2540 READER *
  SPOOL 000D 2540 PUNCH A
  SPOOL 000E 1403 A
  CONSOLE 009 3215 T
 LINK MAINT 0190 0190 RR
 LINK MAINT 019D 019D RR
 LINK MAINT 019E 019E RR
 LINK MAINT 0402 0402 RR
 LINK MAINT 0401 0401 RR
#
USER definitions
User definitions (virtual machine definitions or guests) begin with a USER directory control statement and define an individual virtual machine.
The USER statement starts each virtual machine's directory entry. It also defines a user ID and password, a logon and maximum virtual storage size, and command privileges.
Here is one example of user definitions, in this case the PMAINT user:
USER PMAINT   WD5JU8QP  128M 1000M G
 AUTOLOG AUTOLOG1 OP1 MAINT
 ACCOUNT 1 SYSPROG
 MACH ESA
 POSIXINFO UID 0 GNAME system
 OPTION MAINTCCW LNKS LNKE LNKNOPAS
 IPL 190
 NAMESAVE GCS
 NAMESAVE VTAM
 CONSOLE 009 3215 T
 LINK MAINT 190 190 RR
 LINK MAINT 193 193 RR
 LINK MAINT 19E 19E RR
 LINK MAINT 19D 19D RR
 LINK MAINT 401 401 RR
 LINK MAINT 402 402 RR
 SPOOL 00C 2540 READER *
 SPOOL 00D 2540 PUNCH  A
 SPOOL 00E 1403 A
The above directory control statement defines a virtual machine called PMAINT, whose password is 'WD5JU8QP'. When PMAINT logs on it is allocated 128 Megabytes of virtual storage. It is allowed a maximum of 1000 Megabytes of virtual storage, and it is a class G, or general user.
The following table contains a description of different command classes:
Class User and Function
- A System Operator: The class A user controls the z/VM system. The system operator is responsible for the availability of the z/VM system and its resources. In addition, the system operator controls system accounting, broadcast messages, virtual machine performance options, and other options that affect the overall performance of z/VM.Note: The class A user who is automatically logged on during CP initialization is designated as the primary system operator.
- B System Resource Operator: The class B user controls all the real resources of the z/VM system, except those controlled by the system operator and the spooling operator.
- C System Programmer: The class C user updates or changes system-wide parameters of the z/VM system.
- D Spooling Operator: The class D user controls spool files and the system's real reader, printer, and punch equipment allocated to spooling use.
- E System Analyst: The class E user examines and saves system operation data in specified z/VM storage areas.
- F Service Representative: The class F user obtains, and examines in detail, data about input and output devices connected to the z/VM system. This privilege class is reserved for IBM use only.
- G General User: The class G user controls functions associated with a particular virtual machine.
- Any Commands belonging to class "Any" are available to any user, regardless of the user's privilege class. These commands are primarily those used to gain access to, or relinquish access from, the z/VM system.
- H Reserved for IBM use.
- I - Z - 6 These classes are reserved for redefinition by each installation for its own use (using MODIFY statements or commands).
- Privilege Classes
#
Creating a simple CMS user
This section will provide you instruction to create a CMS VM. In the
first step we will not even have disks on this VM and we will learn how
to add minidisks and how to resize it. This machine will be used to host
some files that will be used on next chapter
(
#
How to create a new VM
Our objective is to create a new VM called VMTOOLS. There is a special file type called DIRECT. We are going to create a new file called VMTOOLS DIRECT that will host the directory statements needed to run our CMS VM.
& Logged as MAINT
& Create a file called VMTOOLS DIRECT
X VMTOOLS DIRECT A& Input the following content:
(*|\textcolor{blue}{USER VMTOOLS WORK2016 64M 64M G}|*)
(*|\textcolor{green}{IPL CMS}|*)
(*|\textcolor{red}{SPOOL 000C 2540 READER *}|*)
(*|\textcolor{red}{SPOOL 000D 2540 PUNCH A}|*)
(*|\textcolor{red}{SPOOL 000E 1403 A}|*)
(*|\textcolor{red}{CONSOLE 009 3215 T}|*)
(*|\textcolor{green}{LINK MAINT 0190 0190 RR}|*)
(*|\textcolor{green}{LINK MAINT 019D 019D RR}|*)
(*|\textcolor{green}{LINK MAINT 019E 019E RR}|*)
The blue line defines the name, password, amount of memory and privilege class of our new VM
The green lines are related to CMS. We are linking disks that are required to IPL CMS in our VM
The red lines are related to some standard devices, like Reader, Punch, Printer and Console.
& Save the file and quit
====> FILE& To add our new VM to the directory we are going to use DIRM ADD command:
DIRM ADD VMTOOLS& If you got RC = 0, we are good, otherwise there is a typo in your VMTOOLS DIRECT file, fix the error and try again.
#
How to add a minidisk
& Try to login in your new VM and you will see a message:
z/VM Version 6 Release 3.0, Service Level 1501 (64-bit),
built on IBM Virtualization Technology
There is no logmsg data
FILES: 0003 RDR,   NO PRT,   NO PUN
LOGON AT 13:30:14 EDT SATURDAY 07/16/16
z/VM V6.3.0    2015-06-18 16:09

DMSACP113S A(191) not attached or invalid device address
Ready; T=0.03/0.03 13:30:16
& Ops! We don't have an "A-disk" to our VM... we need to create it.
& Logoff from VMTOOLS
& Logon on MAINT
& Execute:
DIRM FOR VMTOOLS AMD& It will show a PANEL that need to be filled like this one (The passwords are in blank but you can set as: READ WRITE MULTI):
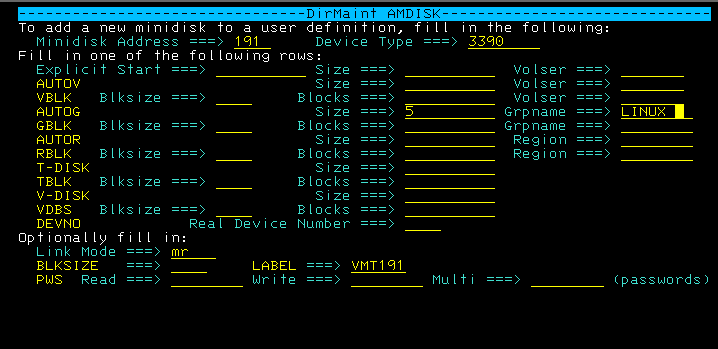
& We are creating a new minidisk 191, from our LINUX GROUP, with 5 cylinders. The label is VMT191.
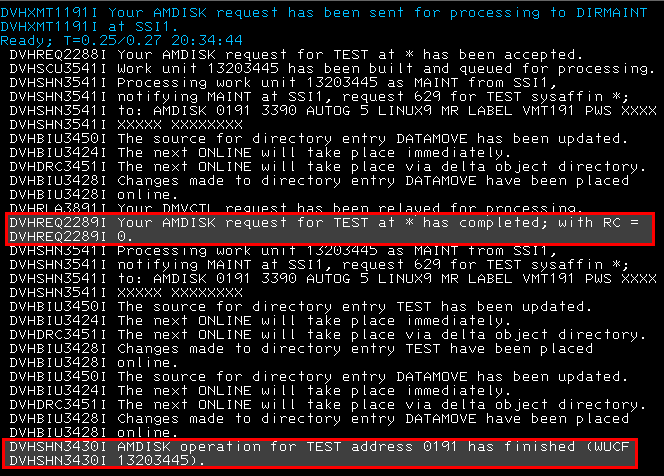
& The expected result is:
& If you want to check how different is your VMTOOLS directory execute:
DIRM FOR VMTOOLS REView& RECEIVE <n> (REP
Where <n> is the reader id that will show at the begging of the response.

& You can open using XEDIT and you will see the new MDISK statement at the bottom
X VMTOOLS DIRECTMDISK 0191 3390 0001 5 LNX301 MR XXXXXXXX XXXXXXXX XXXXXXXX
#
How to change minidisk size
& Execute
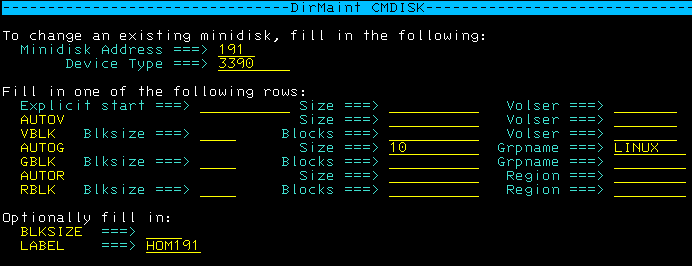
DIRM FOR VMTOOLS CMD& DIRM FOR VMTOOLS CMD will open a panel
& We are going to increase the size of 191 minidisk from 5 cyl to 10 cyl
& Follow the panel:
& Press F5 to submit.
#
Exercise
Add a new minidisk:
& Address: 192 & Device type: 3390 & On AUTOG: && Size: 300 && Grpname: LINUX & Link Mode: MR & Label: LNX192 & Passwords: && READ WRITE MULTI
#
FTP files to VMTOOLS 192
During the class the instruction will teach you how to FTP files to our new minidisk 192. These files are essential to the Linux installation. These steps are not documented here because it depends on your environment.
These instructions are present in the slide deck.
#
Creating our Linux Profile
On this section a profile to be included by Linux virtual machines will be created.
& Log on as MAINT. & Create the user directory source file.
===> x LINDFLT DIRECT& In XEDIT tipe "INPUT" to enable input mode
===> INPUT& Paste de following content
PROFILE LINDFLT
COMMAND CP SET PF12 RETRIEVE
COMMAND CP SET PF11 RETRIEVE FORWARD
COMMAND SET VSWITCH VSW1 GRANT &USERID
COMMAND DEFINE NIC 600 TYPE QDIO
COMMAND COUPLE 600 TO SYSTEM VSW1
IPL CMS
MACH ESA 2
CPU 00 BASE
OPTION APPLMON
SPOOL 000C 2540 READER *
SPOOL 000D 2540 PUNCH A
SPOOL 000E 1403 A
CONSOLE 009 3215 T
LINK MAINT 0190 0190 RR
LINK MAINT 019D 019D RR
LINK MAINT 019E 019E RR
LINK VMTOOLS 192 191 RR
LINK TCPMAINT 592 592 RR
& Hit ENTER two times to exit input mode.
Explanation
& PROFILE LINDFLT - Define the profile named LINDFLT & COMMAND CP SET PF12 RETRIEVE - Enable F12 to retrieve commands & COMMAND CP SET PF11 RETRIEVE FORWARD - Enable F11 to & COMMAND SET VSWITCH VSW1 GRANT &USERID - Grant access to VSW1 & COMMAND DEFINE NIC 600 TYPE QDIO - Define a network card on vaddr 600 & COMMAND COUPLE 600 TO SYSTEM VSW1 - Couple the NIC to VSW1 & IPL CMS - When the user ID is logged on, IPL CMS & MACH ESA 2 -The machine architecture is ESA with a maximum of 4 CPUs. & OPTION APPLMON - To enable Linux guest for data gathering & CPU 00 BASE - CPU 00 is the base and the only CPU set for now & SPOOL 000C 2540 READER * - Definition of a virtual reader & SPOOL 000D 2540 PUNCH A - Definition of a virtual punch & SPOOL 000E 1403 A - Definition of a virtual printer & CONSOLE 009 3215 T - Definition of a console & LINK MAINT 0190 0190 RR - Link to MAINT's 190 minidisk with read access & LINK MAINT 019D 019D RR - Link to MAINT's 19D minidisk with read access & LINK MAINT 019E 019E RR - Link to MAINT's 19E minidisk with read access & LINK VMTOOLS 192 191 RR - Link to VMTOOLS 192 minidisk as 191 with read access & LINK TCPMAINT 592 592 RR - Link to TCPMAINT's 592 minidisk with read access. This is where the ftp utility is located.
& Save and quit XEDIT using "file" command.
To add our new profile to z/VM directory use DIRM ADD:
DIRM ADD LINDFLTdirm add lindflt
PUN FILE 0021 SENT TO DIRMAINT RDR AS 0051 RECS 0020 CPY 001 0 NOHOLD NOKEEP
DVHXMT1191I Your ADD request has been sent for processing to DIRMAINT at
DVHXMT1191I ZVMWSXX.
Ready; T=0.01/0.01 14:37:31
DVHREQ2288I Your ADD request for LINDFLT at * has been accepted.
DVHBIU3450I The source for directory entry LINDFLT has been updated.
DVHBIU3424I The next ONLINE will take place immediately.
DVHBIU3428I Changes made to directory entry LINDFLT have been placed
DVHBIU3428I online.
DVHBIU3450I The source for directory entry LINDFLT has been updated.
DVHBIU3424I The next ONLINE will take place immediately.
DVHBIU3428I Changes made to directory entry LINDFLT have been placed
DVHBIU3428I online.
DVHBIU3450I The source for directory entry LINDFLT has been updated.
DVHBIU3424I The next ONLINE will take place immediately.
DVHBIU3428I Changes made to directory entry LINDFLT have been placed
DVHBIU3428I online.
DVHBIU3450I The source for directory entry LINDFLT has been updated.
DVHBIU3424I The next ONLINE will take place immediately.
DVHBIU3428I Changes made to directory entry LINDFLT have been placed
DVHBIU3428I online.
DVHBIU3450I The source for directory entry LINDFLT has been updated.
DVHBIU3424I The next ONLINE will take place immediately.
DVHBIU3428I Changes made to directory entry LINDFLT have been placed
DVHBIU3428I online.
DVHREQ2289I Your ADD request for LINDFLT at * has completed; with RC =
DVHREQ2289I 0.
RUNNING ZVMWSXX
#
Create the LINUX1 virtual machine
To create a Linux image we will use a DASD 3390-09 (10016 cyl) as base. DIRMAINT has a feature called PROTODIRs that we can use to create directory template for our Linux.
& First, grab a copy of LINUX PROTODIR
===> DIRM SEND LINUX PROTODIR& Receive a file called LINUX PROTODIR and edit it
X LINUX PROTODIR& In XEDIT tipe "INPUT" to enable input mode
===> INPUT& Paste de following content
USER LINUX NOLOG 1G 1G G
INCLUDE LINDFLT
MDISK 0100 3390 AUTOG 1600 LINUX MR READ WRITE MULTIPLE
MDISK 0101 3390 AUTOG 800 LINUX MR READ WRITE MULTIPLE
MDISK 0102 3390 AUTOG 6016 LINUX MR READ WRITE MULTIPLE
MDISK 0103 3390 AUTOG 800 LINUX MR READ WRITE MULTIPLE
MDISK 0104 3390 AUTOG 800 LINUX MR READ WRITE MULTIPLE
& Save and close the file
& Apply the LINUX PROTODIR changes using the following command
===> DIRM FILE LINUX PROTODIRdirm file linux protodir
PUN FILE 0320 SENT TO DIRMAINT RDR AS 0424 RECS 0013 CPY 001 0 NOHOLD NOKEEP
DVHXMT1191I Your FILE request has been sent for processing to DIRMAINT
DVHXMT1191I at SSI1.
Ready; T=0.12/0.14 13:34:17
DVHREQ2288I Your FILE request for MAINT at * has been accepted.
DVHRCV3821I File LINUX PROTODIR E2 has been received; RC = 0.
DVHREQ2289I Your FILE request for MAINT at * has completed; with RC = 0.& Create the virtual machine definition for LINUX1. []
===> dirm add linux1 like linux pw zcloud& If you receive RC = 0, you should be able to query your new VM:
q linux1
HCPCQU045E LINUX1 not logged on
Ready(00045); T=0.01/0.01 13:36:33
& If you receive "Invalid option - LINUX1" response, something wrong
occured on step
q linux1
HCPCQV003E Invalid option - LINUX1
Ready(00003); T=0.01/0.01 13:38:31
#
Exercise
& Create LINUX2 VM. This VM will be used on chapter